Skip to content
Power Up for Adventure: A Step-by-Step Guide to Installing a Dual Battery Isolator and ANL Fuses for an Unstoppable Outdoor Lifestyle
- by Luis Fonseca
A Dual Battery Isolator with ANL fuses is crucial for those who require a stable and safe power source for their vehicles. The isolator ensures that the auxiliary battery is charged while the engine is running and also protects the main battery's power reserve by isolating it when the engine is turned off. ANL fuses provide an extra layer of protection by functioning as a circuit breaker in the event of a power surge, preventing damage to the electrical system. The combination of a Dual Battery Isolator and ANL fuses helps preserve the reliability and longevity of the electrical system in a vehicle, making it a smart investment for anyone who requires a constant power source for their vehicle.
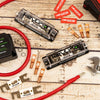
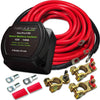
Here's a step-by-step guide for installing Keyline's 140Amp VSR Dual Battery Isolator along with Keyline's ANL 12V Inline Fuse Holder Block Complete Kit with Fuses:
-
Locate a spot near the batteries and easily accessible for the Keyline 140Amp VSR.
-
Before installation, disconnect the negative terminal of both batteries to ensure safety.
-
Connect the main battery positive cable to the input terminal of the Keyline ANL 12V Inline Fuse Holder marked "BAT 1".
-
Place a Keyline 150-amp Professional Grade Ceramic ANL Fuse in the ANL Fuse Holder, following the manufacturer's instructions for the correct fuse rating.
-
Connect the output terminal of the Keyline ANL Fuse Holder to the Keyline 140Amp VSR input terminal marked "BAT 1".
-
Connect the auxiliary battery positive cable to the input terminal of another Keyline ANL 12V Inline Fuse Holder marked "BAT 2".
-
Install another Keyline 150-amp Professional Grade Ceramic ANL Fuse in the second ANL Fuse Holder, following the manufacturer's instructions for the correct fuse rating.
-
Connect the output terminal of the second Keyline ANL Fuse Holder to the Keyline 140Amp VSR output terminal marked "BAT 2".
-
Attach the Keyline 140Amp VSR ground wire to a suitable ground point such as the chassis ground.
-
Connect the Keyline 140Amp VSR control wire to the alternator, making sure it's connected to the correct terminal that provides voltage only when the engine is running.
-
Test the Keyline 140Amp VSR by starting the engine and verifying that both batteries are being charged.
-
After turning off the engine, disconnect the auxiliary battery negative terminal to ensure it is isolated from the main battery when the engine is not running.
-
Re-attach the negative terminals of both batteries.
-
Verify that the Keyline 140Amp VSR is functioning correctly by starting the engine and checking that power is being supplied from the main battery to the auxiliary battery.
Note: The steps above are general guidelines and may vary depending on the specific installation requirements. Always follow the manufacturer's instructions for specific details.
So why wait? Upgrade to Keyline's professional-grade equipment and take the first step towards a more adventurous outdoor lifestyle. With a dependable power source, you can explore new places and embark on new adventures without worries. Don't let a dead battery hold you back, upgrade to Keyline's Dual Battery Isolator and ANL Fuse Kit today!


